
A Demonstrator’s Guide to Reinforced Banners
:And How to Use Them
This guide explores how to construct reinforced banners that can function as a mobile shield wall during demonstrations.
To be clear, we do not encourage anyone to engage in illegal activity with banners or shields. We only offer these designs to satisfy the curiosity of historians.
Refining a Defensive Tool
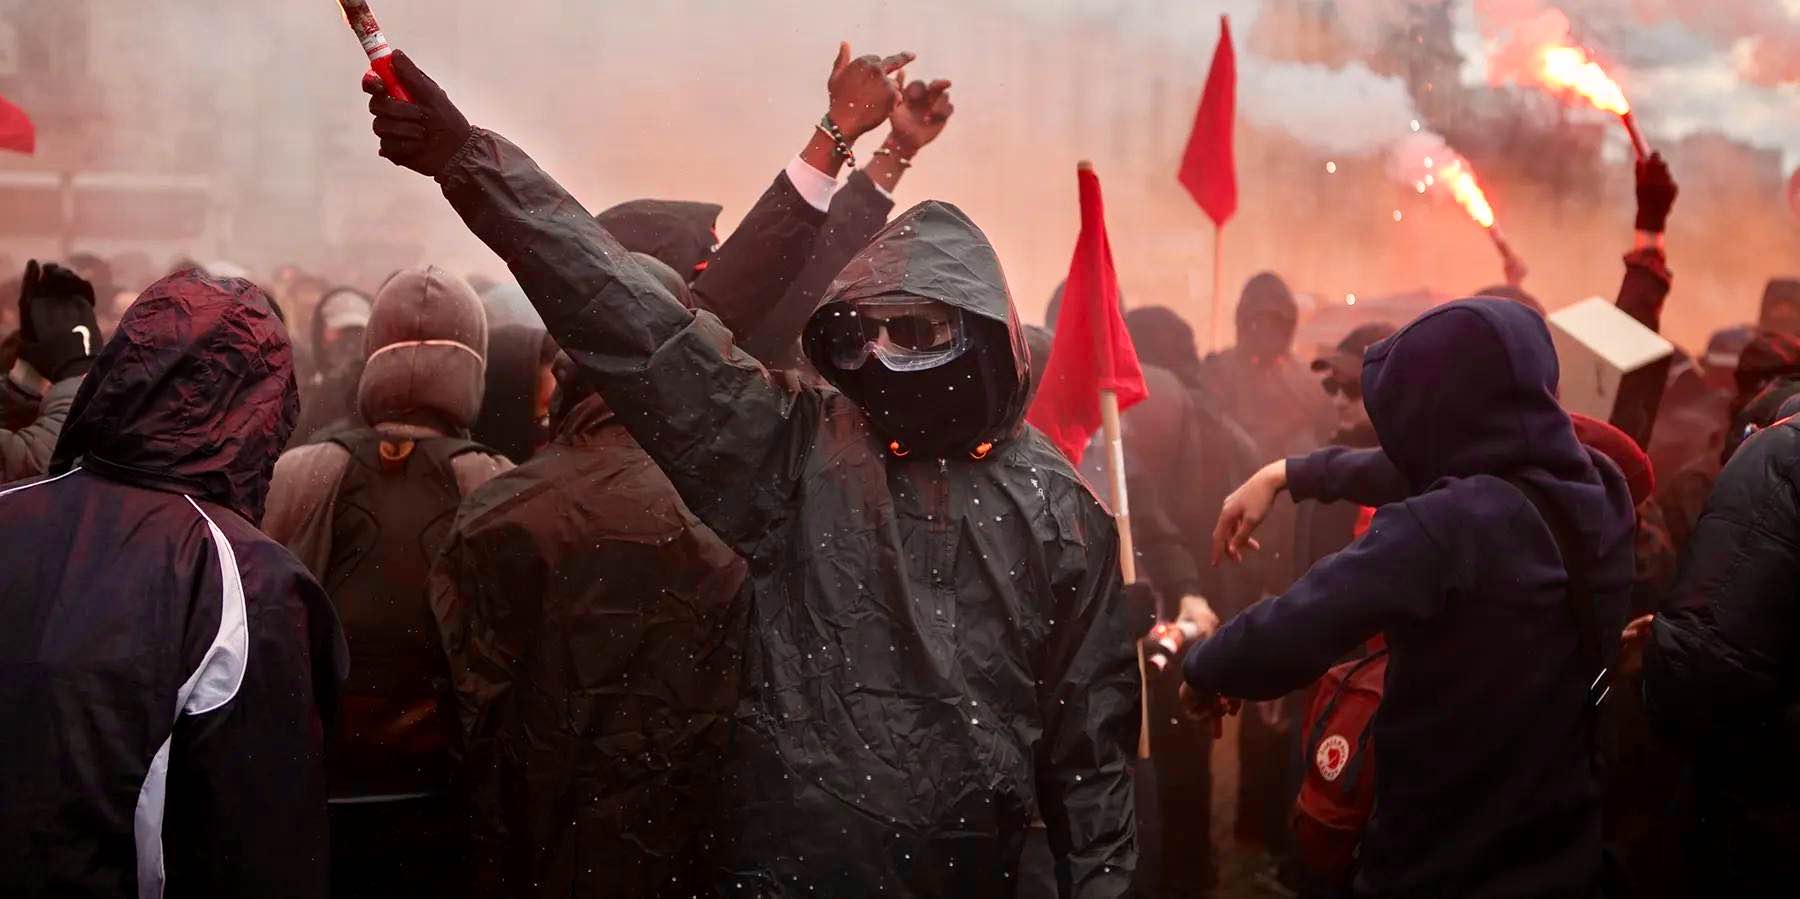
In our city, anarchists have spent several months improving a design for reinforced banners. We use these banners to protect ourselves from police violence. Often, in large actions in which dozens of people arrive with a plan, these banners play a role in both offensive and defensive activities.
Initially, we used a wooden frame for our banners. This involved light but solid pieces of wood, metal handles for a firm grip, and a tarp across a wooden frame. The frame was solid and a team of three could carry it. However, even though the wood was light and we made several experiments with different kinds of lighter and lighter wood, the design was still too heavy. In addition, a comrade from another country observed that the banner attracted too much attention going in and out of actions. Where he came from, you could fold banners. Another issue was that it was not especially difficult for a kick or police baton to pierce the tarp that covered the frame.
Our new design, which we have tested with satisfactory results, has four core advantages: it is 1) light 2) cheap 3) foldable 4) dense.
We prepared this guide after comrades from many different cities responded enthusiastically to our new design.
Shields and Reinforced Banners
You can use shields and reinforced banners to accomplish many different things:
- Protect yourself from rubber bullets, water cannons, batons, pepper spray, and being tackled or punched.
- Protect others who move behind the shield, whether they are engaging in activities such as throwing rocks and using paint-filled fire extinguishers or are simply in need of protection or assistance.
- Conceal activity that is going on behind the shield, including changing clothes or preparing tools.
- Act as a solid wall for pushing back opponents without engaging in clumsy and risky grappling.
- Serve as an intimidation tactic, instilling fear or uncertainty in adversaries, especially when the participants have many shields.
- Function as a decoy, becoming the focal point of police attention, despite not being a high-risk tool, enabling others to act while police are distracted.
- Similarly, rather than arresting people, police often focus on grabbing shields or banners. It is better for police leave with their arms full of duct tape and plastic than dragging off a comrade.
Compared to reinforced banners, shields have the benefits of being lighter and easier to make; they allow whoever is holding them more agility and spontaneity. When you have a shield, you can easily ditch it, run around, and make your own decisions. In a context in which agility is needed, shields may be best.

A shield wall in Myanmar.
What reinforced banners bring to the table is their size and their physical and organizational power. Because these banners are held by several people, they are harder to tear away, offering more protection. A police officer cannot simply tackle a person on the other side of a reinforced banner. For the same reasons, it is harder for opponents to withstand pushes from these tools. Reinforced banners can stop not just one but several officers from entering a crowd. In this way, they can enable a crowd to assert a balance of power with the police, establishing distinct areas of control.
In our city, we have seen more than a dozen comrades pushing forward a single reinforced banner as a dozen cops push against the other side,1 in a contest of strength as the police tried to attack the crowd while paint, rocks, and fireworks rained upon them from behind the banner. Organizationally, seeing several people holding a banner seems to encourage crowd unity around them, creating a focal point for defense and action. This has the benefit of impeding police from using intimidation to break up a group, especially when they simply do not have the numbers to do so by other means.
Shields
In the end, the choice between shields and reinforced banners depends on whether you aim to employ a symmetrical or asymmetrical approach to conflict. Is your goal to engage in a direct contest of strength in order to gain or maintain terrain, or is it more important to prioritize agility and ability to separate from a crowd as needed? How long do you need to be able to sustain frontal clashes after losing the element of surprise? Reinforced banners can offer more protection from many police actions, but defending a fixed position can quickly open up other vulnerabilities. The answer to these questions likely depends on the nature and location of the action. If it is a general riot, the shield may be better, but if it is a focused offensive or an effort to defend a large crowd, a reinforced banner may be better.

Diagram I.
In Diagram I., you can see another group’s design for a shield that uses some cardboard for cushioning, cut up pieces of a trash can, and rope, hose, or bike tube. We are a little confused over the function of the second layer of plastic (the trash can lid), and would recommend using the cardboard as the cushion that your arm rests on—otherwise, a strong impact such as a baton could break the plastic, severely injuring your hand. Plastic is generally not a forgiving surface for you to be directly touching during any kind of impact.
Similarly, it is probably advisable to make sure that any sharp edges are covered with duct tape in case you fall on your shield or hit yourself with it. In our city, we made some shields with a trash bin part and wrapped them thickly in duct tape so that the cardboard stuck on firmly, and made handles using duct tape as well. Basically, shields are easy to make with items you can find lying around.

Improvised shields in a demonstration against US Immigrations and Customs Enforcement assaults in June 2025.
Different shield designs are better for different situations. Like umbrellas and leaf blowers, shields can do things in large numbers that they cannot do alone. If you want to form a shield wall, ideally your shield should be big enough to cover your body. But the bigger your shield is, the heavier, bulkier, and more difficult to transport it will be. Smaller shields can be lighter and easier to sneak into a protest area. Many people have been carrying smaller shields with them while playing other roles besides maintaining the shield wall. Having even just a little bit of protection has saved people from serious injury and provided the confidence to hold territory they might not otherwise have been able to.
A common Portland shield design involves cutting a plastic barrel vertically into three or four curved rectangles, leaving the circles from the top and bottom of the barrel for making smaller shields.
To form a shield wall, it is best to be able to line up shields so that they overlap slightly, as even slight breaks in the wall can present a vulnerability. Consequently, plywood may be preferable to barrels for that particular application.
July 2020, day 58 of Oakland participating in the George Floyd Uprising: a shield wall at an event expressing solidarity with those in Portland resisting federal attacks. Footage by Sarah Belle Lin.
Metal Reinforced Banner Design
Important: The visual in Diagram II. shows just two segments of reinforced banner, though we recommend reinforced banners with three segments, as they provide more coverage. Each segment is held by one person; as you can see in Diagram II., each has two handles, one for the left hand and one for the right. Each piece is connected by zip ties all along their connecting edges so that they can fold in on each other. We recommend making banners with three pieces so that they can be held by three people.

Diagram II.
Fingerprints: We recommend that you use gloves while interacting with the materials that you use to make the banner and while handling the banner itself. It’s not illegal to make a reinforced banner, but nonetheless, for a variety of reasons, you might not want to be connected with one.

Diagram III.
The following legend elucidates the seven elements of Diagram III.
1.) Metal: We get our metal frame by cutting out a piece of temporary construction fencing. You can use bolt cutters. The kind of metal you want is firm and light—not flimsy or bendy like chain-link fencing. The size you want to cut out is roughly 3.5 feet in height by 2.5 feet in length. In measuring, our aim to make sure that when crouching low, we can cover our bodies with the metal, and when standing up straight, we can duck our heads behind the metal while still covering some of our legs.

This is the kind of metal fencing you want.
2.) Corrugated Plastic: We use a sturdy but shock-absorbent corrugated plastic, the sort that is often used in yard signs. Sturdy cardboard could fulfill the same purpose. In any case, you want this to be larger, in length and height, than the metal part. This will protect you from hitting yourself with the metal once you connect the cardboard behind the metal.

Corrugated plastic.
3.) Zip Ties: Use zip ties to connect the corrugated plastic or cardboard to the metal. Make sure the second layer is completely firm against the metal.
4.) Handles: As depicted in Diagram IV., the handles require three components: 1) sponges 2) zip ties 3) duct tape. The sponges should be fat and shock resistant. Your hand should rest comfortably on the sponges, shielded from impact. Cut a hole through the plastic or cardboard layer so that the sponge can be zip-tied all the way through to the metal. Create another hole in the cardboard above and below the sponge so that you can lace duct tape through the metal. Lace the duct tape many times over until it forms a durable handle. Make sure your hand fits in between the duct tape handle and the sponge.

Diagram IV.
Make two handles: one higher, another directly beneath the other, both centered horizontally. You should now be able to lift the banner.
5.) Cover the Edges: Cover the edges of the metal with several layers of duct tape so that it is softer, in case the banner strikes you or someone else.
Repeat the above steps three times so as to create three segments for your banner.
6.) Zip Ties to Connect the Segments: Connect the three segments to each other by adding zip ties along their adjoining edges. So, for instance, in the graphic showing a two-person banner, the left and right pieces are connected by zip ties running through the middle. These will function as hinges, enabling you to fold the banner.
7.) Painted Tarp: Attach a long tarp across the front of all three pieces, wrapping the edges around onto the back of the banner and zip-tying them tightly into place. The tarp is the banner component of the reinforced banner. Paint something on the tarp such as a slogan or sign. If you use spray paint to make your job easier, consider using stencils for better results.

Diagram V.
Using Reinforced Banners
Form a crew that will carry the banner. Because they will be taking up positions at the front line of any conflict, they should be equipped with helmets, goggles, masks, and gloves. They should discuss their goals and plans in advance, including their specific shared commitments to each other and their backup plans for various scenarios.
It’s important to develop a shorthand to communicate and make decisions rapidly, so as to be able to move swiftly when necessary. Go over this ahead of the action.
Organize a support team for those carrying the banner. These people can be equipped with a variety of tools to defend the banner carriers, including umbrellas. We have seen crowds use laser pointers, projectiles, paint-filled fire extinguishers, and other tools from behind banners.
The greatest points of vulnerability are at the edges of the banner. You can address this by flanking the banner with a crowd bearing shields and umbrellas, or perhaps by keeping a wall to one side of you. Be careful not to risk being surrounded—the chief source of security for those carrying the banner is the crowd controlling the area behind them, which can back them up or pull them to safety if need be. If they can get close enough, police may also try to grab the top or bottom of the banner in order to pull it down or up. Stay mobile and make sure that they are discouraged from doing so.
You could coordinate discreetly in advance with other crews you trust so that they know that you are bringing a reinforced banner. Discuss how your plans might interact with theirs.
You should identify your goals in advance and discuss when and where to deploy the banner. It may be necessary to smuggle it into the area where the action will take place folded up—for example, disguised as a pile of protest signs—in order to maintain the element of surprise.
Police will not necessarily let you enter a potential conflict zone with a reinforced banner if they can identify it in advance. In especially challenging conditions, you could bring it into the area ahead of time and leave it somewhere relatively safe (for example, hidden on an inactive construction site), or wait for a march to get started and then join it with the banner while police are scrambling to keep up with events. This banner design is light enough that it could be delivered by bicycle.
Other strategic questions include figuring out which area of the action to position the banner in, especially if you intend to employ it for both distraction and defense.
Do not hesitate to abandon the banner if necessary. We usually drop ours once an action is over and it is time to disperse. The banner is a tool, not property to retain. The banner is not a person. Protect people over banners. It is ideal if police cannot recover your banner in order to learn its construction and perform forensic tests on it, but it’s not worth risking arrest or identification for that purpose.
People elsewhere in the world have experimented with rolling floats built on metal shopping carts or other devices, which can serve as mobile barricades or even as rams.
We don’t see reinforced banners as a substitute for building stationary barricades, which can provide equivalent protection to a larger group of people in a given location.

Appendix: Be Ready for the Uprising
We have seen shields deployed in uprisings in Chile and Hong Kong in 2019, and in cities like Portland during the George Floyd rebellion of 2020, and have witnessed reinforced banners in struggles such as the fight to defend Weelaunee Forest in Atlanta.
Right now, unrest is deepening. Here are some words of encouragement for uprisings.
-
Revolt: A revolt is comprised of combative direct action against the forces of authority. If this kind of street activity is an option for you, focus on it. In our city, we have sometimes been caught up focusing on writing projects, social media, and big meetings during moments of unrest when we could have been making immediate plans for street action or targeting infrastructure. Uprisings are the time to put everything aside. These are the moments we have been waiting our whole lives for. Let’s plan actions that aren’t ritualized resistance, that show just how far we can take things and how seriously we take this moment.
-
Affinity: Focus on working with the small group of people you already deeply trust. These should be people you are aligned with, with whom you share ideas, values, and a comparable degree of risk tolerance. Meet to form plans and to prepare so that you can arrive confident and coordinated, especially at events that are likely to become unpredictable. At the minimum, this could look like a quick meeting in the morning, preparing tools together midday, and going to a protest at night. Stick together and look out for each other. Do what it takes to protect your comrades. Show them how much you care about them during, before, and after.
-
Self-Organization: To become real revolutions, revolts require anarchist ideas and social organization. Make a clear list of short-term priorities to make the best of these fleeting moments of insurrection. Do not become overambitious. If you have time outside of street activity, pick a project and do a good job of it. This could mean creating shields or other tools, engaging in social media work, distributing flyers, organizing small-group invitational actions away from big crowds, or planning actions in larger groups and coalitions. You could call for neighborhood assemblies through word of mouth, flyers, or social media in order to create an opportunity to discuss ideas and strategies. It is necessary to cultivate opportunities for people to meet, spaces where our perspectives can be shared, readings can be spread, and we can build confidence that we can arrange our whole lives via self-organization without need of governments, hierarchy, or capitalism.
Further Reading
- A Demonstrator’s Guide to Body Armor
- A Demonstrator’s Guide to Gas Masks and Goggles
- A Demonstrator’s Guide to Helmets
- A Demonstrator’s Guide to Understanding Police Batons and How to Protect against Them
- A Demonstrator’s Guide to Understanding Riot Munitions and How to Defend against Them
And, for extra credit:
- Bodyhammer: A zine from the turn of the century, discussing shields, helmets, body armor, group movement, shield walls, and other formations.
- How the White Overalls Beat the Cops with Tactics of Radical Defense
-
For an example of this, see the cover of the first issue of Rolling Thunder. ↩


